SharePoint Online Site Access Governance using MS Flow and Azure Function

In this post, I am going to demonstrate Office 365 Site Access Governance using the approval process.
Here I have leveraged the below tools to achieve the functionality,

  1. Power apps/SPFx web part to take the request from the user
  2. SharePoint list to store the requested information
  3. Microsoft Flow will trigger after item creation and send to Azure function
  4. An azure function in which the business logic has been implemented to provide access to the requested site collection.

1. Create a Power App/SPFx web part to configure on the SharePoint page

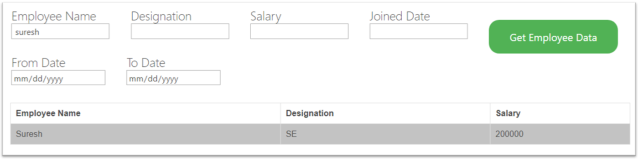
Ok, I will start with the user request form, here it’s completely based on the client requirement which fields should be displayed on the user request form. you have to design the form accordingly.

2. Create a SharePoint list to store the requested information

3. Create Approval Workflow using Microsoft Flow

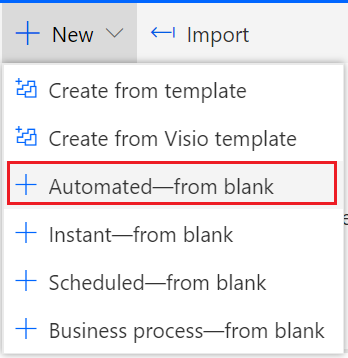
Open the URL https://flow.microsoft.com/ and choose the Blank template under the New button.

BlankTemp1

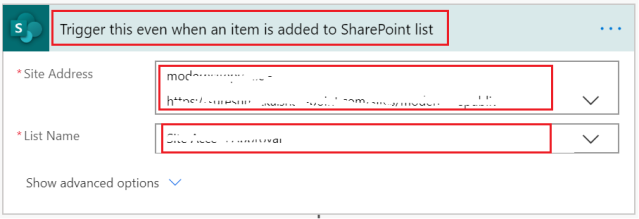
After selecting the template to choose When an item is Created and provide the name of the flow,

TemplateSelection

Now you should provide the Site Collection URL where the SharePoint list and web parts are configured,  remember that the below template message I have added a custom message please don’t get confused that the template selection with the name.

SiteGovernaceURL

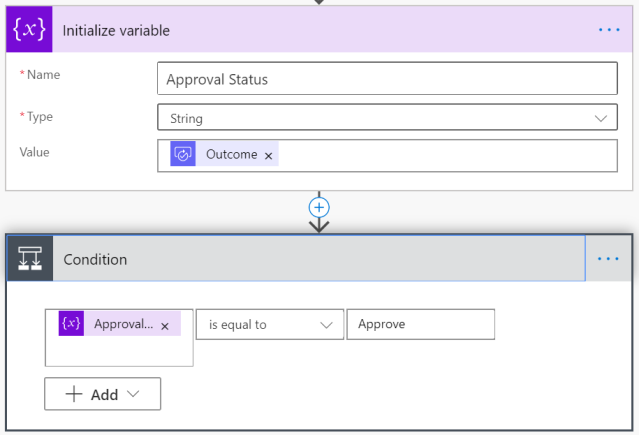
After establishing the valid connection click on the New Step button and select the template as Initialize variable,

AccessForVariable

Provide the variable name and type as a string,

AccessforRequestedUsers

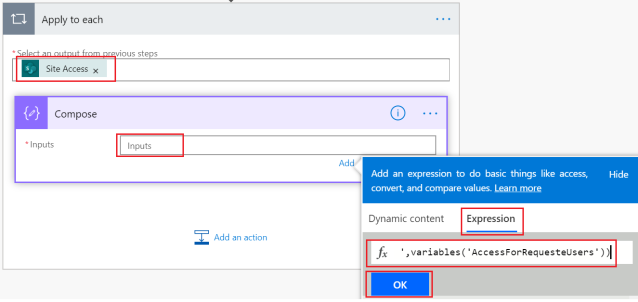
After creating the variable the next step is to click on the New step and select the template Apply to each, inside the template on the top Select output from previous steps, select the SharePoint list field which is having all access requested user email values.

Under the Apply to each control-click Add an action again add Compose variable control. after adding the click on the Inputs control, now it will open a popup there click Expression tab under the add the below expression and click OK.

concat(items(‘Apply_to_each’)?[‘Email’],’,’,variables(‘AccessForRequesteUsers’))

AccessUserExpression

Now click on the Add an action with in the same Apply to each control, add a variable with control type: Set variable

UserResultIntializationtoVariable

From the dropdown select the variable which already initialized variable and assign the output.

UserResultIntializationtoVariable-Result

Finally, after completing all configuration the Apply to each control looks like,

UserResultIntializationtoVariable-ResultView

By using the above control the flow is concatenated and stored the requested user values in a single variable, now we will use the HTTP request to send the requested item information to Azure function, to configure this click on New step and type HTTP from the search box and select the HTTP control,

HTTPTriggerEvent

After selecting the control need to configure the values which need to be sent to Azure function in JSON format.

HTTPTriggerJson

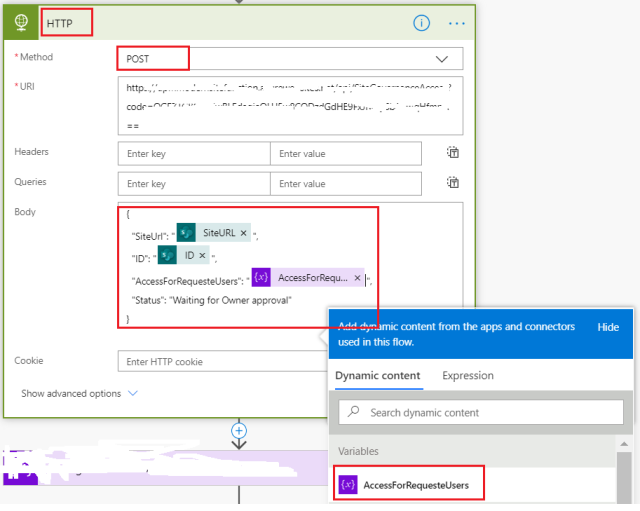
Here I have used only 4 properties to send the requested item information to Azure function, but you can as many required as per the business requirements.

Method: POST

URI: The URL needs to copy from the Azure function I will explain in the Azure function creation step.

Body: Here I used the JSON format to send the dynamic values that are populating from the current item and AccessrequestedUsers are taking the resulting form the variable which we already Compose and stored the final result in a variable.

The next step select Initialize variable control to store the response values from the Azure function,

GetSiteCollectionAdministrators

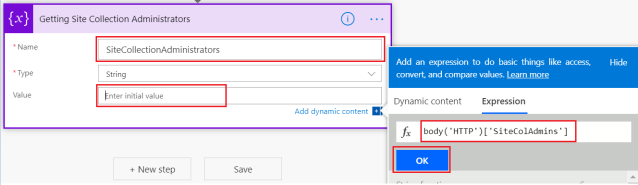
To get the response from Azure function with specific property use the below syntax,

body(‘HTTP‘)[‘SiteColAdmins’]

Note: The value HTTP should be the same as before the HTTP Control selection name( on top), if not it will not work.

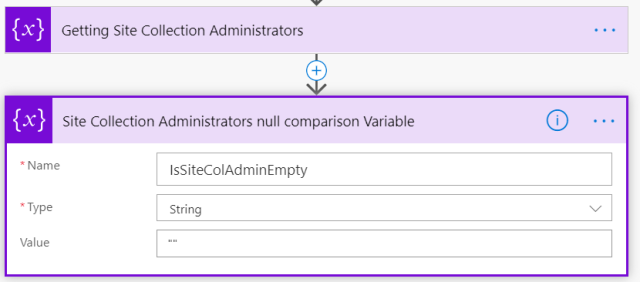
The next step would be to Initialize the variable which is used to compare the null values.

SiteCollectionAdminEmptyCheck

Now add one condition to validate the requested site collection administrators are not null,

AdminEmptyValidation

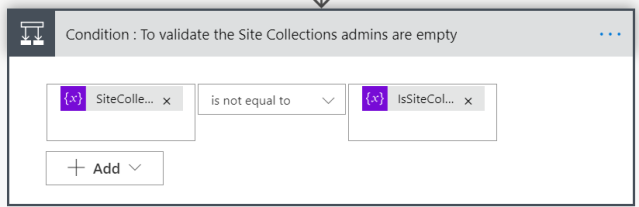
After adding the above condition you will get two conditions IF Yes, IF No.

In this post, I am going to use multiple conditions, for a better explanation I will use numbers for IF conditions.

Condition 1: IF Yes

Under IF Yes condition click Add an action and again add one more condition to compare if the requested site is Private or Public or any other site template.

BeforeApprovalSiteTypeComparision

Condition 1: IF No: Here I am not adding any functionality

Again under the same condition, there will be two actions IF Yes, IF No.

Condition 2: IF Yes

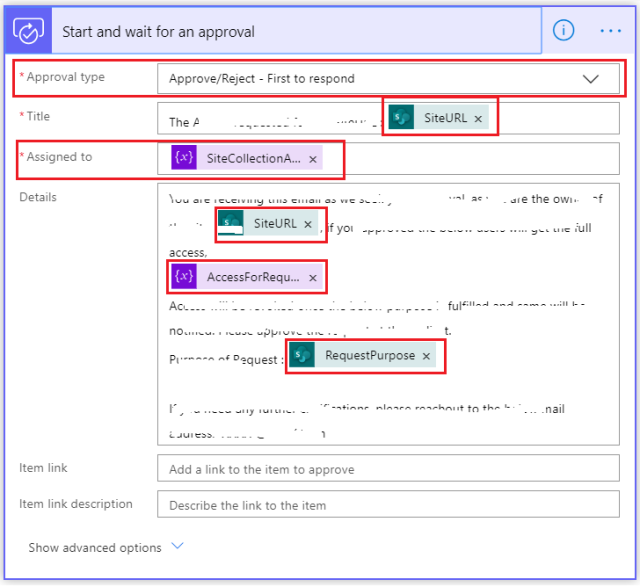
Under IF Yes, click  Add an action and add Start and wait for an approval  control,

StartAndWaitApprovalFlow

After adding the control do the below configuration,

Startanwaitflowcontent

After the workflow execution click Add an action, add the Condition and compare with the Responses value.

ApprovalWFResponce

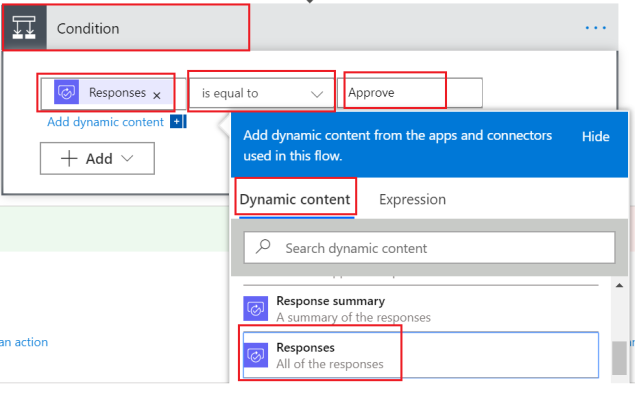
I have observed some times from the Approval flow Outcome is getting the value please check the below condition as well,

ApprovalStatus

Under the above condition, there will be two actions IF Yes, IF No

Condition 3: IF Yes

Under If Yes condition adds one more HTTP request with Owner Approved Status.

AfterOwnerApprovedHTTP

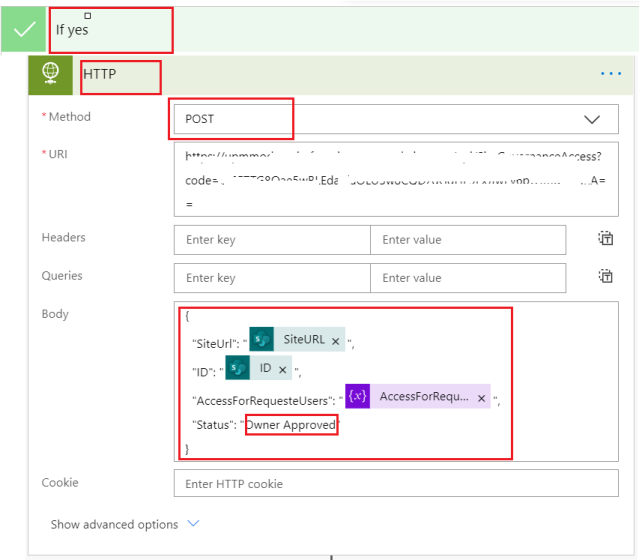
After any one of the owners approved the Azure function will provide access to the requested site. Finally, it will send an email to the Owners and requested users.
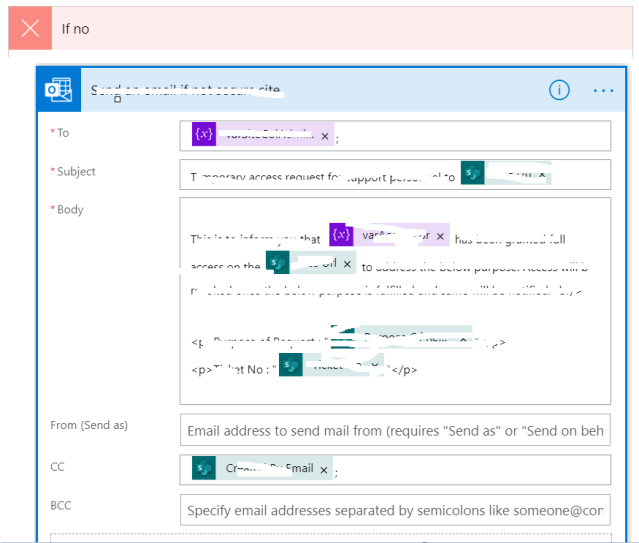
Condition 2: IF No

Under IF No, Add an action add Sent an email control, because as per the scenario if the site belongs to the Private or any other secure templates the approval process will execute else it will automatically provide the access and send an email to the requested users and site collection administrators.
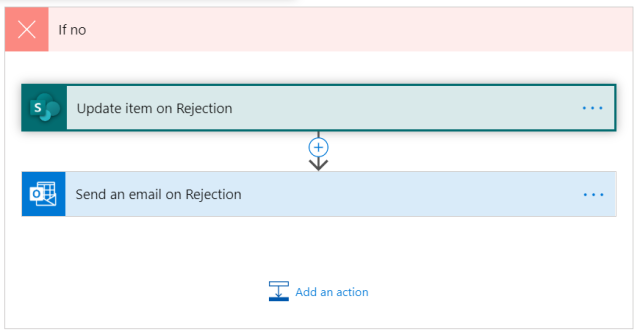
DirectApprovalEmail

Condition 3: IF No

IF No: This scenario will execute if the owner of the site is Rejected the request, then it will send a rejected email to requested users and Site collection administrators, this will happen very rarely if it happens to need to contacts directly to the owners of the site.

RejectionEmail

4. Create an Azure Function using PnP PowerShell. 

In this blog post, I am not going to explain detailed steps on how to create Azure function, because I have already explained all the steps on one of my previous blog post please use the link to create.

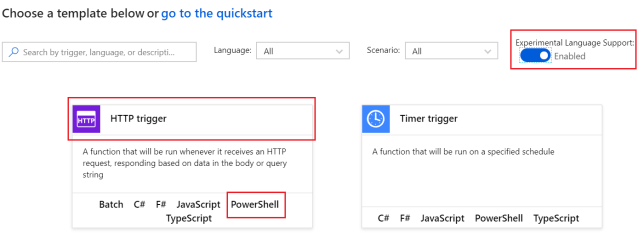
In my earlier post, I have used the Queue trigger template to create an azure function, but in the current scenario, I have used the HTTP trigger with the PowerShell template.

HttpTrigger

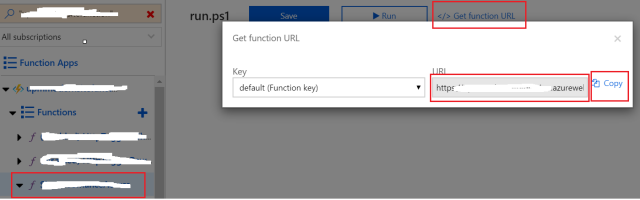
After creating the HTTP trigger we need to copy URL, which needs to be configured on the MS Flow.

HTTPAzurelink

Finally, the script will be,

#region [ Configuration values ]
$requestBody = Get-Content $req -Raw | ConvertFrom-Json
$RequestedSiteURL = $requestBody.SiteUrl
$ID = $requestBody.ID
$AccessRquestedEmails = $requestBody.AccessForRequesteUsers
$ApprovalStatus = $requestBody.Status

#Values are coming form Azure function properties/ if required we can configure directly
#$TenantUrl = $env:SPO_TenantUrl
#$UserName = $env:SPO_UserName
#$PassWord = $env:SPO_PassWord

$TenantURL = ‘Add Tenant URL’
$ListUpdateSiteURL = ‘Site collection URL : Where List created to store/update the requested item’
$UserName = ‘User email’
$PassWord = ‘Pass word’

$UserEmailValues = $AccessRquestedEmails.Substring(0,$AccessRquestedEmails.LastIndexOf(‘,’))
[string[]] $UserEmails = $UserEmailValues -split ‘,’

$Pwd = ConvertTo-SecureString $PassWord -AsPlainText -Force
$Creds = New-Object System.Management.Automation.PSCredential($UserName,$Pwd)

$ListName = ‘List Name’ #provide the list name
$ClassicTeamSiteTemplate = ‘STS’
$CommunicationSiteTemplate = ‘SITEPAGEPUBLISHING’
$CommunicationSiteType = ‘Modern Communication Site’
$ModernTeamSiteTemplate = ‘GROUP’
$AllAdminUsers = “”
$ExceptionMessage = “”
$IsUserfound = “True”;
$SiteType=”Team Site”
$OwnerApprovalStatus = ‘Owner Approved’

#endregion

Connect-PnPOnline -Url $RequestedSiteURL -Credentials $Creds

$WebTemp = Get-PnPWeb -Includes “WebTemplate” | Select-Object -Property WebTemplate
Write-Output “Web Template is ” $WebTemp.WebTemplate

if (($webTemp.WebTemplate -eq $ClassicTeamSiteTemplate) -OR ($webTemp.WebTemplate -eq $CommunicationSiteTemplate)) {

if ($webTemp.WebTemplate -eq $CommunicationSiteTemplate) {
$SiteType = $CommunicationSiteType
}

$AdminEmails = @()

Write-Output “Condition to validate the approval status if it’s approved or not ”

if ($ApprovalStatus -ne $OwnerApprovalStatus) {

$SiteCollectionAdmins = Get-PnPSiteCollectionAdmin
foreach ($AdminUser in $SiteCollectionAdmins) {
if($AdminUser.Email -ne “”){
$AdminEmails += $AdminUser.Email
}
}
Connect-PnPOnline -url $ListUpdateSiteURL -Credentials $Creds

foreach ($Sitecoladmin in $AdminEmails) {
try {
Write-Output “Updated site col admins values to SharePoint list” $WebTemp.WebTemplate
Set-PnPListItem -List $ListName -Identity $ID -Values @{“SiteColAdmins” = $Sitecoladmin; “SiteType” = $SiteType } -ErrorAction Stop
}
catch {
$IsUserfound = “False”
$ExceptionMessage += $($_.Exception.Message) +”and owners are $($admins)”
Write-Output “Exception Message: $($ExceptionMessage) and owners are $($admins)”
Set-PnPListItem -List $ListName -Identity $ID -Values @{“SiteType” = $SiteType; “Error_x0020_Detail” = $($ExceptionMessage); “OwnerStatus” = “Closed” }
}
}
if ($IsUserfound -eq “True”) {
Set-PnPListItem -List $ListName -Identity $ID -Values @{“SiteColAdmins” = $AdminEmails; “SiteType” = $SiteType }
}

# Adding one more condition if the site belongs to the Communication site directly gives access.If there are any other site templates we can wait till the owner approves

if ($SiteType -eq $CommunicationSiteType) {
Write-Output “Given the access to the users”
Connect-PnPOnline -url $RequestedSiteURL -Credentials $Creds
Add-PnPSiteCollectionAdmin -Owners @($UserEmails)
Connect-PnPOnline -url $ListUpdateSiteURL -Credentials $Creds
Set-PnPListItem -List $ListName -Identity $ID -Values @{“SiteType” = $SiteType; “Status” = “Closed”; “OwnerStatus” = “Updated Owner” }
}

} else {

try {
#This part will execute when the owner approved request through MS flow

Write-Output “Started approval process after owner approved”
Connect-PnPOnline -Url $ListUpdateSiteURL -Credentials $Creds
$GetSiteCol=(Get-PnPListItem -List $ListName -Id $ID -Fields “SiteColAdmins”).FieldValues
$ContainsSiteCol=$GetSiteCol[“SiteColAdmins”].Email

if($ContainsSiteCol){
Connect-PnPOnline -Url $RequestedSiteURL -Credentials $Creds
Add-PnPSiteCollectionAdmin -Owners @($UserEmails)
Connect-PnPOnline -url $ListUpdateSiteURL -Credentials $Creds
Write-Output “Access given to requested users after the owener approval ”
Set-PnPListItem -List $ListName -Identity $ID -Values @{“SiteType” = $SiteType; “Status” = “Closed”; “OwnerStatus” = “Owner Approved” }
} else {
Connect-PnPOnline -url $ListUpdateSiteURL -Credentials $Creds
Write-Output “Exception Message: $($ExceptionMessage)”
Set-PnPListItem -List $ListName -Identity $ID -Values @{“SiteType” = $SiteType; “Status” = “Closed”; “OwnerStatus” = “Error” }
}

}

catch {
Connect-PnPOnline -url $ListUpdateSiteURL -Credentials $Creds
$ExceptionMessage += $($_.Exception.Message)
Write-Output “Exception Message: $($ExceptionMessage)”
Set-PnPListItem -List $ListName -Identity $ID -Values @{“SiteType” = $SiteType; “Error_x0020_Detail” = $($ExceptionMessage); “Status” = “Error” ; “OwnerStatus” = “Error”}
}
}
Disconnect-PnPOnline

foreach ($UserEmail in $AdminEmails) {
$AllAdminUsers += $UserEmail + ‘;’
}

Write-Output “All Admin users ” $AllAdminUsers

} else {

#region [ Execute the below functionality for Modern team sites: We can apply the same approval process for Modern private sites as well depends on Business requirement ]

if(($webTemp.WebTemplate -eq $ModernTeamSiteTemplate)) {

try {

Connect-PnPOnline -Url $TenantURL -Credentials $Creds

$OgroupSession = New-PSSession -ConfigurationName Microsoft.Exchange -ConnectionUri https://outlook.office365.com/powershell-liveid/ -Credential $Creds -Authentication Basic -AllowRedirection

Import-PSSession -AllowClobber $OgroupSession

Write-Output “Connected to exchange online”

Connect-PnPOnline -Url $RequestedSiteURL -Credentials $Creds

$OfficeGroupId = (Get-PnPSite -Includes GroupId).GroupId.ToString()
$AccessType = Get-UnifiedGroup -Identity $OfficeGroupId | Select-Object -Property AccessType
Write-Output “Access type is ” $AccessType.AccessType ” and Office group id is “$OfficeGroupId
$SiteType=$AccessType.AccessType

$Owners = Get-UnifiedGroup -Identity $OfficeGroupId | Get-UnifiedGroupLinks -LinkType Owner | Select-Object -Property WindowsLiveId
$O365GroupOwners = $Owners.WindowsLiveID

Write-Output “Owners are ” $O365GroupOwners

$GroupOwners = @()

foreach ($Owner in $O365GroupOwners) {
$GroupOwners += $Owner
}

Write-Output “Site Owners ” $GroupOwners

Connect-PnPOnline -Url $RequestedSiteURL -Credentials $Creds

if ($SiteType -eq “Public”) {
$MembershipOwnerType = ‘Owner’
$MembershipMemberType = ‘Member’
foreach ($reqowner in $ToEmails) {
if ($reqowner) {
Write-Output “Started Adding user to office 365 owner gorup ” $reqowner
Add-UnifiedGroupLinks -Identity $OfficeGroupId -LinkType $MembershipMemberType -Links $reqowner
Add-UnifiedGroupLinks -Identity $OfficeGroupId -LinkType $MembershipOwnerType -Links $reqowner
}
}

}

Connect-PnPOnline -url $ListUpdateSiteURL -Credentials $Creds
Write-Output “Update the Sharepoit list after providing the access to modern site”
Set-PnPListItem -List $ListName -Identity $ID -Values @{“SiteType” = “Modern Team Site – ” + $accessType.AccessType; “Status” = “Closed”; “OwnerStatus” = “Updated Owner” }

} catch{

Connect-PnPOnline -url $ListUpdateSiteURL -Credentials $Creds
$ExceptionMessage += $($_.Exception.Message)
Write-Output “Exception Message: $($ExceptionMessage)”
$updatedItem=Set-PnPListItem -List $ListName -Identity $ID -Values @{“SiteType” = “Modern Team Site – ” + $accessType.AccessType; “Error_x0020_Detail” = $($ExceptionMessage); “Status” = “Error”; “OwnerStatus” = “Error” }
}

foreach ($UserEmail in $O365GroupOwners) {
$AllAdminUsers += $UserEmail + ‘;’
}

Write-Output “All Admin users ” $AllAdminUsers
#endregion
}
}

$body = @{

ID=$ID
AccessFor=$UserEmails
SiteType=$SiteType
SiteColAdmins=$AllAdminUsers

} | ConvertTo-Json
Out-File -Encoding Ascii -FilePath $res -inputObject “$body”


From the above script if you observe that the last @body tag properties will send back the response to the MS Flow, here I used only 4 properties if you want you can send the other properties as per the business requirement.

Hope this blog will help you if you get similar kind requirement 🙂 🙂


Posted in Uncategorized | Leave a comment

How to display the Azure SQL table data in Power Apps form

In this blog post, I am going to explain how to display the data on Power Apps form Azure SQL table.

Let me explain step by step approach,

Log in to the https://make.powerapps.com/  site, from the left pane click Create then select the Canvas app from blank template provide the name of the app and click create button.

After getting created a new form there will be one more page that will show by providing the options, over there simply select Skip.

Paapsskip.PNG

After clicking the Skip button it will create a new form as per the below screen,

PappsConnectData.PNG

From the above screen, there will be one option called Connect to data click on the option, now it will open one pane with few options on the left side, click the Data source icon now you will find the default connectors, from the search text box search with SQL you can find the default connector SQL Server –> click on that it will open one more popup from there click Add a connection as per the below screen dump,

PappsSQLConnection.PNG

Now it will open one more panel for selecting the Authentication Type, there are three types of Authentications available those are,

  1. SQL Server Authentication
  2. Azure AD Integrated
  3. Windows Authentication

From the dropdown select the SQL Server Authentication type and provide the all required information,

PappsSQLConnectionData.png


After the connection has established successfully, click on the Ribbon, select Insert option then add Vertical template from Gallery to display all items,

PappsGalleryImage

Now select the Vertical template and then select the Data source, now you will get one more option which will display all the tables form the Database, form the options choose the table which you need to display the items.

PappsGalleryImageConnect

After selecting the table the screen will display the items on the form, but here it will display only a few fields if you want to display all related information about the item you have to create one more screen and add the additional functionality OnSelect even for Right arrow mark.

To implement the functionality create a New screen by selecting the Blank template name it as Screen2 only, now open the Screen1, from the items click on any item right arrow mark as per below screen,

PappsItemNavigate.png

After clicking the arrow mark to select the Onselect  event from the left top dropdown, and add followed syntax

Navigate(Screen2,ScreenTransition.Fade,{selectedId: Gallery1.Selected.UserId})

Note: Here UserId is my custom column which is created on the SQL table. you can replace the field name as per the available fields form the table.

Again go back to Screen2 click on the Insert –> Forms –> select Display option

PappsItemValues.png

Now click on the connect data –> from the left panel you have to select the Data Source as the table name –> then click on the Edit fields inside the Data source dropdown –> from the new panel click on Add field –> now choose which fields should be displayed on the newly created form –> finally click on the Add button.

PappsItemDisplayFields.png

now open the form and select the item even form the dropdown and paste the syntax

First(Filter(‘[dbo].[Users]’,UserId= selectedId))

Note: Here UserId is my custom column which is created on the SQL table.

PappsItemDisplayValues.png

Once everything is configured publish the app and test the functionality.


Posted in Uncategorized | Leave a comment

Custom Image Slider web part from SharePoint online Image library

By default, SharePoint will provide out of box Picture Library Slideshow Web Part to display the images as slider, still, if you want the customize the look and feel you can create a custom web part by using Rest API.

Please use the below code to display the custom slideshow web part.

Note : Please remember due to design issue i am not added html open and close tags here, so please update when you used the code.

link rel=”stylesheet” href=”https://maxcdn.bootstrapcdn.com/bootstrap/3.3.7/css/bootstrap.min.css”
script src=”https://ajax.googleapis.com/ajax/libs/jquery/3.3.1/jquery.min.js”></script
script src=”https://maxcdn.bootstrapcdn.com/bootstrap/3.3.7/js/bootstrap.min.js”></script
script type=”text/javascript”
$(function() {
var listName=”Crowsel”;
GetImagesFromLibrary(listName);
});
function GetImagesFromLibrary(listName){
var requestUri = _spPageContextInfo.webAbsoluteUrl + “/_api/web/lists/getbytitle(‘”+listName+”‘)/items?$select=FileRef,Title&$top=5&$orderby=Created desc”;
$.ajax({
url: requestUri,
method: “GET”,
async:false,
headers: { “Accept”: “application/json; odata=verbose” },
success: function (data) {
$.each(data.d.results,function(i,item){
var cInnerHtml=””;
if(i==0){
$(“#myCarousel .carousel-indicators”).append(‘<li data-target=”#myCarousel” data-slide-to=”0″ class=”active”></li>’);
cInnerHtml+='<div class=”item active”>’;
}else{
$(“#myCarousel .carousel-indicators”).append(‘<li data-target=”#myCarousel” data-slide-to=”‘+i+'”></li>’);
cInnerHtml+='<div class=”item”>’;
}
cInnerHtml+='<img src=”‘+item.FileRef+'” alt=”‘+item.Title+'” style=”width:100%;”>’;
cInnerHtml+='</div>’;
$(“#myCarousel .carousel-inner”).append(cInnerHtml);
});
},
error: function (data) {
}
});
}
/script
<div class=”container”>
<div id=”myCarousel” class=”carousel slide top-to-bottom” data-ride=”carousel”>
<ol class=”carousel-indicators”>
</ol>
<div class=”carousel-inner”>
</div>
</div>
</div>

<style>
.container{
width:303px !important;
}

.top-to-bottom .carousel-inner {
height: 100%;
}

.carousel.top-to-bottom .item {
-webkit-transition: 0.6s ease-in-out top;
-moz-transition: 0.6s ease-in-out top;
-ms-transition: 0.6s ease-in-out top;
-o-transition: 0.6s ease-in-out top;
transition: 0.6s ease-in-out top;
}

.carousel.top-to-bottom .active {
top: 0;
}

.carousel.top-to-bottom .next {
top: 400px;
}

.carousel.top-to-bottom .prev {
top: -400px;
}
.carousel.top-to-bottom .item {
left: 0;
}

/style

Posted in Uncategorized | Leave a comment

How to create a piechart to display items from SharePoint list

In this post, I will explain how to create a pie chart for SharePoint list items.
Before starting the code part open your SharePoint site and create a custom list and add some required fields.
Here I have created one field Available as an integer field type.

The sample list data will be,

PieChartlist.PNG

Now create a new page and add script editor web part, then paste the below code.

Note : Please remember due to design issue i am not added html open and close tags here, so please update when you used the code.

script type=”text/javascript” src=”https://ajax.googleapis.com/ajax/libs/jquery/3.3.1/jquery.min.js”></script
script type=”text/javascript” src=”https://cdnjs.cloudflare.com/ajax/libs/highcharts/7.2.0/highcharts.js”></script
div id=”piechart-container” style=”border:1px solid !important;width: 400px;”></div
script

ExecuteOrDelayUntilScriptLoaded(GetPieChartData, “sp.js”);
var piechartArray = new Array();
var piechartItems;
function GetPieChartData(){
piechartArray = [];
var pieChartContext = new SP.ClientContext.get_current();
var pieChartlist = pieChartContext.get_web().get_lists().getByTitle(‘SiteSpace’);
var pieChartquery = new SP.CamlQuery();
piechartItems = pieChartlist.getItems(pieChartquery);
pieChartContext.load(piechartItems);
pieChartContext.executeQueryAsync(Function.createDelegate(this, GetPieChartDataSuccess), Function.createDelegate(this, GetPieChartDataFail));

}

function GetPieChartDataSuccess(sender, args) {
var pieChartitemcount = piechartItems.get_count();
if (pieChartitemcount != 0) {
var piechartitemenumerator = piechartItems.getEnumerator();
while (piechartitemenumerator.moveNext()) {
var piechartlistitem = piechartitemenumerator.get_current();
var piechartname = piechartlistitem.get_item(“Title”);
var availablespace = piechartlistitem.get_item(“Available”);
var piechartitems = {
name: piechartname,
data: [ availablespace ]
};
piechartArray.push(piechartitems);
}
DrawpieChart();
}
}

function GetPieChartDataFail(sender, args) {
alert(‘Request failed. ‘ + args.get_message() + ‘\n’ + args.get_stackTrace());
}

function DrawpieChart() {
var piechartvalues = new Array();
for(i =0; i < piechartArray.length ; i++){
piechartvalues.push([piechartArray[i].name,piechartArray[i].data[0]]);
}
Highcharts.setOptions({
colors: [‘#9900ff’,’#43b997′]
});
lineChart = new Highcharts.Chart({
chart: {
renderTo: ‘piechart-container’,
type: ‘pie’
},
title: {
text: ”
},
legend: {
enabled: true,
floating: true,
verticalAlign: ‘xbottom’,
align:’right’,
layout: ‘vertical’,
y: $(this).find(‘#piechart-container’).height()/4, //chart.height/4
labelFormatter : function() {
var total = 0; $.each(this.series.data, function() { total+=this.y; });
return this.name + ‘: ‘ + this.y + ‘ GB’;
}

},
tooltip: {
pointFormat: ‘{this.name}:’
},
plotOptions: {
pie: {
size:’90%’,
dataLabels: {
enabled: false,
center:[‘10%’, ‘10%’]
},
allowPointSelect: true,
cursor: ‘pointer’,
dataLabels: {
enabled: false
},
showInLegend: true
}
},
series: [{
data: piechartvalues
}]
});
}
/script

The final ouptput will be,

PieChartData.PNG

Posted in Uncategorized | Leave a comment

How to create a line chart and column chart to display items from SharePoint list

In this post, I will explain how to create a Line chart for SharePoint list items.
Before starting the code part open your SharePoint site and create a custom list and add some required fields.
Here I have created some fields by providing the month names and fields type is number, after creating the list my sample data will be,

Note: The below code will both line chart and column chart the only thing change will be just replacing the type of the chart form the Highcharts.Chart properties.

LatestHits
Now create a new page and add script editor web part, then paste the below code.

Note : Please remember due to design issue i am not added html open and close tags here, so please update when you used the code.

script type=”text/javascript” src=”https://ajax.googleapis.com/ajax/libs/jquery/3.3.1/jquery.min.js”></script
script type=”text/javascript” src=”https://cdnjs.cloudflare.com/ajax/libs/highcharts/7.2.0/highcharts.js”></script

h2 class=”tm-block-title”>Site Hits</h2>
div id=”linechart-container” style=”border:1px solid !important;width: 400px;”></div

<script>

ExecuteOrDelayUntilScriptLoaded(GetLineChartData, “sp.js”);
var linechartArray = new Array();
var linechartItems;
function GetLineChartData(){
linechartArray = [];
var lineChartContext = new SP.ClientContext.get_current();
var lineChartlist = lineChartContext.get_web().get_lists().getByTitle(‘LatesHitsData’);
var lineChartquery = new SP.CamlQuery();
linechartItems = lineChartlist.getItems(lineChartquery);
lineChartContext.load(linechartItems);
lineChartContext.executeQueryAsync(Function.createDelegate(this, GetLineChartDataSuccess), Function.createDelegate(this, GetLineChartDataFail));

}
function GetLineChartDataSuccess(sender, args) {
var lineChartitemcount = linechartItems.get_count();
if (lineChartitemcount != 0) {
var linechartitemenumerator = linechartItems.getEnumerator();
while (linechartitemenumerator.moveNext()) {
var linechartlistitem = linechartitemenumerator.get_current();
var linechartname = linechartlistitem.get_item(“Title”);
var janitems = linechartlistitem.get_item(“January”);
var febitems = linechartlistitem.get_item(“February”);
var marchitems = linechartlistitem.get_item(“March”);
var aprilitems = linechartlistitem.get_item(“April”);
var mayitems = linechartlistitem.get_item(“May”);
var juneitems = linechartlistitem.get_item(“June”);
var julyitems = linechartlistitem.get_item(“July”);
var linechartitem = {
name: linechartname,
colors :’#CB2326′,
data: [ janitems, febitems, marchitems,aprilitems,mayitems,juneitems,julyitems ]
};
linechartArray.push(linechartitem);
}
DrawLineChart();
}
}

function GetLineChartDataFail(sender, args) {
alert(‘Request failed. ‘ + args.get_message() + ‘\n’ + args.get_stackTrace());
}
function DrawLineChart() {
Highcharts.setOptions({
colors: [‘#43b997’, ‘#ff0066’, ‘#9900ff’]
});
lineChart = new Highcharts.Chart({
chart: {
renderTo: ‘linechart-container’,
type: ‘line’   // type: ‘column’ for column chart
},
title: {
text: ”
},
xAxis: {
categories: [‘January’, ‘February’, ‘March’,’April’, ‘May’, ‘June’,’July’]
},
yAxis: {
min: 0,
tickInterval: 20,
maxPadding:1,
title: {
text: ‘Hits’
},
stackLabels: {
enabled: true,
style: {
fontWeight: ‘bold’,
color: ‘gray’
}
}
},
legend: {
align: ‘right’,
x: -23,
verticalAlign: ‘top’,
y: 10,
floating: true,
backgroundColor: ‘white’,
borderColor: ‘#CCC’,
borderWidth: 1,
shadow: false
},
tooltip: {
formatter: function() {
return ‘<b>’+ this.x +'</b><br/>’+
this.series.name +’: ‘+ this.y +'<br/>’+
‘Total: ‘+ this.point.stackTotal;
}
},
plotOptions: {
column: {
stacking: ‘normal’,
dataLabels: {
enabled: true,
color: ‘white’,
style: {
textShadow: ‘0 0 3px black, 0 0 3px black’
}
}
}
},
series: linechartArray
});
}
</script>

The final ouptput will be,

LineChart

Posted in Uncategorized | Leave a comment

Organization chart web part In SharePoint using Jquery

In this post, I am going to explain how to create Organization charts in SharePoint using list data.

In this example, I have used the standard Jquery Orgchart libraries,

please, download the files from the link.

Now follow the below steps to develop an Org chart web part.

Approach 1:

Step 1: Create a SharePoint list name it as XXXXXX, and add some required fields.

Here I have created three fields namely Title(default), Supervisor ( Lookup column targeted to Title fields)Designation. Depends on requirements you can add more fields also.

Step 2: Now open the SharePoint site and create a new page, then insert the Script Editor web part and paste the below code.

Note : Please remember due to design issue i am not added html open and close tags here, so please update when you used the code.

script src=”https://ajax.googleapis.com/ajax/libs/jquery/1.9.1/jquery.min.js&#8221; type=”text/javascript”/script
script src=”https://cdnjs.cloudflare.com/ajax/libs/jquery-orgchart/1.0.0/jquery.orgchart.min.js”/script
link rel=”stylesheet” href=”https://cdnjs.cloudflare.com/ajax/libs/jquery-orgchart/1.0.0/jquery.orgchart.min.css&#8221; /
div id=”left”
/div
style
#left{
display:none;
}
div.node.bladerunner {
background-color: #a4a0d9 !important;
}

div.node.replicant {
background-color: #d9ada0 !important;
}

div.node.deceased {
background-color: #d9d2a0 !important;
text-decoration: line-through;
}

div.node.retired {
background-color: #d9c0a0 !important;
text-decoration: line-through;
}
div.orgChart div.node {
width:200px;
}

.userImage{
height: 50px;
width: 50px;
float: left;
margin-top: -8px;
}
.userdesignation{
margin-left: -59px
}

/style

div id=”content”
div id=”main”
/div
/div

ExecuteOrDelayUntilScriptLoaded(loadStructure, “sp.js”);

function loadStructure() {

var context = new SP.ClientContextget_current();.
var web = context.get_web();
var list = web.get_lists().getByTitle(“OrgChart”);
var viewXml = ‘<View><RowLimit>1200</RowLimit></View>’;
var query = new SP.CamlQuery();
query.set_viewXml(viewXml);
this.items = list.getItems(query);
context.load(items, ‘Include(Title, Supervisor,Designation)’);
context.add_requestSucceeded(onLoaded);
context.add_requestFailed(onFailure);
context.executeQueryAsync();

function onLoaded() {
var tasksEntries = [];

var itemsCount = items.get_count();

for (i = 0; i < itemsCount; i++) {
var item = items.itemAt(i);
var taskEntry = item.get_fieldValues();
tasksEntries.push(taskEntry);
}
var topHead = GetChildArrayObjects(tasksEntries, null);
var headName = topHead[0].Title;
var title = topHead[0].Designation + “, Manager :” + topHead[0].Supervisor;
var listString = “<ul id=’organisation’><li class=’hide’ title='” + headName + “‘><b>” + headName +”</b><br/><img src=’/sites/abc/PublishingImages/demo.PNG’ class=’userImage’/><br/><b><span class=’userdesignation’>”+topHead[0].Designation+” </span></b>”;
var childliststring = getChildNodes(tasksEntries, headName, listString);
listString = childliststring + “</li></ul>”;
var divForList = document.getElementById(‘left’);
divForList.innerHTML = listString;
$(“#organisation”).orgChart({ container: $(“#main”), nodeClicked: onChartNodeClicked });
for (var i = 0; i < tasksEntries.length; i++) {
$(“div[title=\”” + tasksEntries[i].Title + “\”]”).balloon({
contents: ‘<img src =”/sites/abc/PublishingImages/demo.PNG”/></br><ul><li> Designation :’ + tasksEntries[i].Designation + ‘</li></ul>’
});
}
}
function onChartNodeClicked(node) {
}
function onFailure() {
alert(‘script failed’);
}
}

function getChildNodes(tasksEntries, headName, liststring) {
var childs = GetChildArrayObjects(tasksEntries, headName);
if (childs.length > 0) {
liststring = liststring + “<ul>”;
for (var cnt = 0; cnt < childs.length; cnt++) {
var head = childs[cnt].Title;
var title = childs[cnt].Designation + “, Manager :” + childs[cnt].Supervisor;
liststring = liststring + “<li class=’bladerunner’ title='” + head + “‘><b>” + head +”</b><br/><img src=’/sites/abc/PublishingImages/demo.PNG’ class=’userImage’/><b><span class=’userdesignation’>”+childs[cnt].Designation+”</span></b>”;
liststring = getChildNodes(tasksEntries, head, liststring);
liststring = liststring + “</li>”;
}
liststring = liststring + “</ul>”;
}
return liststring;
}
function GetChildArrayObjects(items, manager) {
var newArray = [];
for (var i = 0; i < items.length; i++) {
var item = items[i];
if(item.Supervisor == null ){
if (item.Supervisor == manager) {
newArray.push(item);
}
}
else {
if (item.Supervisor.get_lookupValue() == manager) {
newArray.push(item);
}
}
}
return newArray;
}

/script

The final output will be,

OrgStructure.PNG

Approach 2: The above example there is no Expand and Collapse option, it just simple functionality showing all the employees on the same line, if you want to add that functionality please use the below code.
Before starting I will give a sample code that shows how the functionality will work with static values.

script src=”https://balkangraph.com/js/latest/OrgChart.js”/script
div id=”tree”/
style
html, body {
margin: 0px;
padding: 0px;
width: 100%;
height: 100%;
overflow: hidden;
text-align: center;
font-family: Helvetica;
}

#tree {
width: 100%;
height: 100%;
position: relative;
}

/style
script

var chart = new OrgChart(document.getElementById(“tree”), {
mouseScrool: OrgChart.action.none,
collapse: {
level: 2,
allChildren: true
},
nodeBinding: {
field_0: “name”,
field_1: “title”,
img_0: “img”
},
nodes: [
{ name:”Kranthi”,title:”CEO”,img:”/sites/Publishing/PublishingImages/MSD.PNG”,id: 1},
{ id: 2, pid: 1,name:”Satya”,title:”CEO”,img:”/sites/Publishing/PublishingImages/MSD.PNG”},
{ id: 3, pid: 1,name:”Priyanka”,title:”CEO”,img:”/sites/Publishing/PublishingImages/MSD.PNG”},
{ id: 4, pid: 3,name:”Suresh”,title:”CEO”,img:”/sites/Publishing/PublishingImages/MSD.PNG”},
{ id: 5, pid: 2,name:”Thulasi”,title:”CEO”,img:”/sites/Publishing/PublishingImages/MSD.PNG”},
]
});

/script

Now the out will be,

OrgStructureStatic

Now the same functionality can be done dynamically, let see how it will work from SharePoint list,

link rel=”stylesheet” href=”https://cdnjs.cloudflare.com/ajax/libs/orgchart/2.1.6/css/jquery.orgchart.min.css&#8221;
script src=”https://ajax.googleapis.com/ajax/libs/jquery/1.9.1/jquery.min.js&#8221; type=”text/javascript”/script
script src=”https://balkangraph.com/js/latest/OrgChart.js”/script
div id=”tree”
style
html, body {
margin: 0px;
padding: 0px;
width: 100%;
height: 100%;
overflow: hidden;
text-align: center;
font-family: Helvetica;
}

#tree {
width: 100%;
height: 100%;
position: relative;
}

/style

script

function Employee (Title,Supervisor,Designation) {
this.Title= Title;
this.Supervisor = Supervisor;
this.Designation= Designation;

}

ExecuteOrDelayUntilScriptLoaded(loadStructure, “sp.js”);

function loadStructure() {
var context = new SP.ClientContext.get_current();
var web = context.get_web();
var list = web.get_lists().getByTitle(“OrgChart”);
var viewXml = ‘<View><RowLimit>1200</RowLimit></View>’;
var query = new SP.CamlQuery();
query.set_viewXml(viewXml);
this.items = list.getItems(query);
context.load(items, ‘Include(ID,Title, Supervisor,Designation)’);
context.add_requestSucceeded(onLoaded);
context.add_requestFailed(onFailure);
context.executeQueryAsync();

function onLoaded() {
var employeeList = [];
var tasksEntries = [];
var parentid = 0;
var itemsCount = items.get_count();
for (i = 0; i < itemsCount; i++) {
var item = items.itemAt(i);
var taskEntry = item.get_fieldValues();
tasksEntries.push(taskEntry);
}
var topHead = GetChildArrayObjects(tasksEntries, null,employeeList,0);
var headName = topHead[0].Title;
getChildNodes(tasksEntries, headName,employeeList,0);

var chart = new OrgChart(document.getElementById(“tree”), {
mouseScrool: OrgChart.action.none,
collapse: {
level: 2,
allChildren: true
},
nodeBinding: {
field_0: “Title”,
field_1: “Designation”,
img_0: “img”
},
nodes: employeeList
,
});
}
function onFailure() {
alert(‘script failed’);
}
}

function getChildNodes(tasksEntries, headName,employeeList,0) {
var parentid = parentid ;
var childs = GetChildArrayObjects(tasksEntries, headName,employeeList,parentid);
if (childs.length > 0) {
for (var cnt = 0; cnt < childs.length; cnt++) {
var head = childs[cnt].Title;
getChildNodes(tasksEntries, head,employeeList,parentid);
}
}
}

function GetChildArrayObjects(items, manager,employeeList,parentid) {
var newArray = [];
var sameParentvalue = 0;
for (var i = 0; i < items.length; i++) {
var item = items[i];
if(item.Supervisor == null ){
if (item.Supervisor == manager) {
newArray.push(item);
employeeList.push({
Title: items[i].Title,
Supervisor: items[i].Supervisor == null ? null : items[i].Supervisor.get_lookupValue(),
Designation: items[i].Designation,
id : items[i].ID,
img:”/sites/abc/PublishingImages/MSD.PNG”
});
}
}
else {
if (item.Supervisor.get_lookupValue() == manager) {
newArray.push(item);
parentid = sameParentvalue == 0 ? parentid +1 : parentid;
employeeList.push({
Title: items[i].Title,
Supervisor: items[i].Supervisor == null ? null : items[i].Supervisor.get_lookupValue(),
Designation: items[i].Designation,
pid: parentid,
id : items[i].ID,
img:”/sites/abc/PublishingImages/MSD.PNG”
});
sameParentvalue = sameParentvalue +1;
}
}
}
return newArray;
}

/script

Posted in Uncategorized | Leave a comment

How to Embed Power BI reports in SharePoint Classic pages

Modern SharePoint pages provide extensibility to display the PowerBi reports using the Power BI web part, but there is no such a web part are available on Classic sites.

To publish reports please follow the below steps,

Open https://app.powerbi.com/ –> Click the reports which you want to embed in classic pages –> then Go to File menu and select Publish to Web.

PowerBiPublish

After clicking Publish to the web –> It will prompt you to create an embed code. Click on “Create Embed code“.

PowerBiPublishPrompt1

Now click on Publish button to publish the report in the Public web site.

PowerBiPublishPrompt2.PNG

Finally, it will provide the <Iframe> tag,

PowerBiPublishPrompt.PNG

Copy the iframe complete code –> open SharePoint page Insert Content editor web part and paste the complete iframe code –> Save the page.

Now the web part will display the Power BI reports.

Posted in Uncategorized | Leave a comment

Display Sharepoint online list items count using JSON

Here I created a simple web part to display the SharePoint list item count which are created by today and total count.

Please add start tag and end tag for each HTML tags, here I removed because not able to publish with those tags.

script src=”https://ajax.googleapis.com/ajax/libs/jquery/1.9.1/jquery.min.js&#8221; type=”text/javascript”></script

style
#content{
background: cadetblue;
width: 453px;
height: 187px;
}
#totalEmployees{
float: left;
}
.employeecount{

font-size: 64px;
color: white;
}
.orgemployees{
text-align: center;
font-size: 40px;
}
.temployees{
font-size: 26px;
}
#todayjoined {

height: 100px;
width: 100px;
float: right;
margin-right: 50px;
}
.jgmployees{
font-size: 26px;
}
#leftdiv {
float: left;
margin-right: 264px;
}
.employee-div{
float:left;
padding-left: 33px;
margin-top: 15PX;
}
.employee-diveadTitle{
font-size: 26px;
color: white;
}

.employee-divHeadTitle {
font-size: 20px;
color: white;
}
.employee-divhead{
text-align: center;
}
/style

div id=”content”
div class=”employee-divhead”
<span class=”employee-diveadTitle”>Organization Employees</span>
</div>
<div class=”employee-div” id=”totalEmployees”>
<h2 class=”ms-webpart-titleText” style=”text-align:justify;”><span class=”employee-divHeadTitle”>Totla Employees</span></h2>
<div id=”tempnumber”>

/div

/div
div class=”employee-div”
<h2 class=”ms-webpart-titleText” style=”text-align:justify;”><span class=”employee-divHeadTitle”>Today joined Employees</span></h2>
<div id=”todayempnumber”>

/div
/div
/div

script

$(document).ready(function () {

});
ExecuteOrDelayUntilScriptLoaded(loadEmployeecount1, “sp.js”);

function loadEmployeecount1(){
loadEmployeecount();
gettodayemployees();
}

function loadEmployeecount() {

var context = new SP.ClientContext.get_current();
var web = context.get_web();
var list = web.get_lists().getByTitle(“OrgChart”);
var viewXml = ‘<View><RowLimit>1200</RowLimit></View>’;
var query = new SP.CamlQuery();
query.set_viewXml(viewXml);
this.items = list.getItems(query);
context.load(items, ‘Include(Title, Supervisor,Designation,Joineddate)’);
context.add_requestSucceeded(onLoaded);
context.add_requestFailed(onFailure);
context.executeQueryAsync();
function onLoaded() {
var tasksEntries = [];
var itemsCount = items.get_count();
var usercount = “<span class=’employeecount’>”+ itemsCount + ” </span>”;
$(“#tempnumber”).html(usercount);

}
function onFailure() {
alert(‘script failed’);
}
}

function gettodayemployees(){

var context1 = new SP.ClientContext.get_current();
var web1 = context1.get_web();
var list1 = web1.get_lists().getByTitle(“OrgChart”);
var viewXml1 = “<View><Query><Where><Eq><FieldRef Name=’Joineddate’ /><Value Type=’DateTime’><Today/></Value></Eq></Where></View></Query>”;
var query1 = new SP.CamlQuery();
query1.set_viewXml(viewXml1);
this.items1 = list1.getItems(query1);
context1.load(items1, ‘Include(Title, Supervisor,Designation,Joineddate)’);
context1.add_requestSucceeded(onLoaded1);
context1.add_requestFailed(onFailure1);
context1.executeQueryAsync();
function onLoaded1() {
var tasksEntries = [];
var itemsCount1 = items1.get_count();
var usercount1 = “<span class=’employeecount’>”+ itemsCount1 + ” </span>”;
$(“#todayempnumber”).html(usercount1);
}
function onFailure1() {
alert(‘script failed’);
}
}

</script>

The final output will be,

OrgEmployeeCount

Posted in Uncategorized | Leave a comment

Search SharePoint list items using REST API combination of multiple fields

In this post, I will explain how to search the SharePoint list items using Rest API with the combination of multiple fields.

Let’s begin from the scratch, create SharePoint list and required fields, then create a new page, then add script editor web part on the page, finally copy the below code on the web part.

Please add start tag and end tag for each HTML tags, here I removed because not able to publish with those tags.

div class=”employeeinfo” style=”display: block;”
div class=”employee-div”
h2 class=”ms-webpart-titleText” style=”text-align:justify;” span Employee Name /span /h2
<input id=’txtEmpname’ runtat=’server’></input>
</div>
div class=”employee-div”
<h2 class=”ms-webpart-titleText” style=”text-align:justify;”><span>Location</span></h2>
<input id=’txtLocation’ runtat=’server’></input>
/div
div class=”employee-div”
<h2 class=”ms-webpart-titleText” style=”text-align:justify;”><span>Salary</span></h2>
<input id=’txtSalary’ runtat=’server’></input>
</div>
div class=”employee-div getdata”

Get Employee Data

/div
/div

div class=”datefield”
div class=”employee-div”
<h2 class=”ms-webpart-titleText” style=”text-align:justify;”><span>From Date</span></h2>
<input type=”date” id=”dtfrom”>
/div
div class=”employee-div”
<h2 class=”ms-webpart-titleText” style=”text-align:justify;”><span>To Date</span></h2>
<input type=”date” id=”dtto” >
/div
/div
div id=”divListItems”></div>

Please remember that drop the below style with in style tag.

.datefield{
clear:both;
}
.employee-div{
float:left;
padding-left: 33px;
}
.getdata{
margin-top: 20px;
}
.submibutton{
cursor: pointer;
background-color: #4CAF50; /* Green */
border: none;
color: white;
padding: 15px 32px;
text-align: center;
text-decoration: none;
display: inline-block;
font-size: 16px;
border-radius: 16px;
}

.emptyresult{

clear:both;
padding-left: 30px;
padding-top: 32px;
font-size: 35px;
}
#divListItems{

padding-left: 31px;
padding-top: 76px;
}
table {
font-family: arial, sans-serif;
border-collapse: collapse;
width: 76%;
}
td, th {
border: 1px solid #dddddd;
text-align: left;
padding: 8px;
}
.alternate tr:nth-child(2n) {
background-color: silver;
}
.alternate tr {
background-color: white;
}
.alternate tr:nth-child(2n):hover, .alternate tr:hover {
background-color: grey;
}

$(document).ready(function () {
// GetEmployeeData();
});
$(“#button”).click( function() {
var empname = document.getElementById(‘txtEmpname’).value;
var emplocation = document.getElementById(‘txtLocation’).value;
var empsalary = document.getElementById(‘txtSalary’).value;

var empfromdate = document.getElementById(‘dtfrom’).value;

empfromdate=new Date(empfromdate)

empfromdate = empfromdate.getUTCMonth()+1+”/” +empfromdate.getDate()+”/” +empfromdate.getUTCFullYear()

var ddd= $(“#dtfrom”).val();
var date1=new Date(ddd)

var nnn = date1.getUTCMonth()+1 +”/” + date1.getDate() + “/” +date1.getUTCFullYear()

var emptodate = document.getElementById(‘dtto’).value;
var listName = ‘Epmloyee’;
var url = _spPageContextInfo.webAbsoluteUrl;
getemployees(listName, url,empname,emplocation,empsalary,empfromdate,emptodate, function (data) {
var subsites = data.d.results;

if( data.d.results.length > 0 ) {

EMPSearchCode

$(“#divListItems”).html(mytable);
$(“#emptyresults”).html(“”);
} else {
$(“#emptyresults”).html(“There are no results to disply”);
$(“#divListItems”).html(“”);
}
});

});

function getemployees(listName,siteurl,empname,emplocation,empsalary,empfromdate,emptodate, success, failure) {
$.ajax({
url: siteurl + “/_api/web/lists/getbytitle(‘” + listName + “‘)/items?$select=*&$filter=((Title eq ‘”+empname+”‘)or (Location eq ‘”+emplocation+”‘)or (Salary eq ‘”+empsalary+”‘))”,
method: “GET”,
headers: { “Accept”: “application/json; odata=verbose” },
success: function (data) {
success(data);
console.log(data);
},
error: function (data) {
failure(data);
console.log(“Error while getting list data”);
}
});
}

Finally, the web part will display the result as per the below screen dump.

EMpSerachPage
Note: Here the date filtering functionality not working soon I will make sure work with Date filtering also.

Posted in Uncategorized | Leave a comment

Automatically fixing broken links on SharePoint online using PnP PowerShell

After the migration completed of SharePoint from source to destination the web part links will be broken, by opening all pages and fixing manually is a kind of many days of work, alternatively the easiest way is to run the below PowerShell script by providing required details which will reduce the more manual effort.

Here I require to fix the links only from the below web parts,

  1. Summary Links
  2. Script Editor 
  3. Content Editor

If you have to fix on other web parts as well, you have to do the modification on the web part comparison condition.

Let’s start with the script to fix the broken links,

#region [ Site Credentials ]
# ————————- #

$UserName = Read-Host -Prompt “Please enter user Email”
$PassWord = Read-Host -Prompt “Please enter user PassWord”

$Pwd = ConvertTo-SecureString $PassWord -AsPlainText -Force
$Creds = New-Object System.Management.Automation.PSCredential($UserName,$Pwd)

#————————— #

#endregion

#region [ Configuration Values ]

#————————— #

$SiteURL= Read-Host -Prompt “Please enter site ( newly created site collection ) URL:”

$BroeknlinksReplacePageLogPath = Read-Host -Prompt “Please enter broken links web part page to store logs EX: C:\Log.txt”

$BrokenWebparts = ‘Test Web part’

# Here we can pass multiple string values which need to replace

$OldValue =’Old Site ( Full Source URL)’
$NewValue =’New Site ( Full Destination URL)’

$OldValue1 =’~site/’
$NewValue1 =’/’

$OldValue2 =’second old string’
$NewValue2 =’second new string’

$ConteneEditorType= ‘<TypeName>Microsoft.SharePoint.WebPartPages.ContentEditorWebPart</TypeName>’
$SummaryLinksType = ‘name=”Microsoft.SharePoint.Publishing.WebControls.SummaryLinkWebPart’
$ScriptEditorType='<type name=”Microsoft.SharePoint.WebPartPages.ScriptEditorWebPart’

#————————— #

#endregion

Write-Host “——— Started broken links replacement process ———- ” -ForegroundColor Green
Function ReplaceBrokenLinks($SubSiteURL) {

Connect-PnPOnline -Url $SubSiteURL -Credentials $Creds

Write-Host “Started replacing broken links on the site ” $SubSiteURL -ForegroundColor Magenta

$AllPages = Get-PnPListItem -List ‘Pages’ #Need to change the list name if we want get items from differen list

$TotalPages = 0

foreach ($Page in $AllPages) {

$TotalPages++

$GetWebpartsCount = 0

Write-Host “Processing page no:” $TotalPages ” — Out of total pages” $AllPages.Count ” — Page title:” $Page[“FileLeafRef”] -ForegroundColor Cyan

Write-Host “================================================================” -ForegroundColor Cyan

# Write-Host “Started replacing broken links on the Page :” $Page[“FileLeafRef”] -ForegroundColor Green

$PageRelativeURL = $Page[“FileRef”]

#region [ Check page checkout status ]

$ClientContext = Get-PnPContext
$CurrentPage = Get-PnPFile -Url $PageRelativeURL -AsListItem
$PageFile = $CurrentPage.File
$ClientContext.Load($PageFile)
$ClientContext.ExecuteQuery()

if($PageFile.CheckOutType -eq [Microsoft.SharePoint.Client.CheckOutType]::Online){

Write-Host “The current page ” $CurrentPage.File.Name “is in checkout mode, so the script is check in the page.” -ForegroundColor Green

Set-PnPFileCheckedIn -Url $PageRelativeURL
}

#endregion

$AllWebParts = Get-PnPWebPart -ServerRelativePageUrl $PageRelativeURL

foreach ( $WebPart in $AllWebParts) {

$WebPartTitle = $WebPart.WebPart.Properties.FieldValues.Title
[int]$ZoneIndex = $WebPart.WebPart.ZoneIndex
$ZoneID = $WebPart.ZoneId

$WebpartXML = Get-PnPWebPartXml -ServerRelativePageUrl $PageRelativeURL -Identity $WebPartTitle

if(($WebPartTitle.IndexOf($BrokenWebparts) -gt -1) -or ($WebpartXML.IndexOf($SummaryLinksType) -gt -1) -or ($WebpartXML.IndexOf($ConteneEditorType) -gt -1) -or ($WebpartXML.IndexOf($ScriptEditorType) -gt -1) ) {

$GetWebpartsCount++

$WebpartXML = $WebpartXML.Replace($OldValue,$NewValue).Replace($OldValue1,$NewValue1).Replace($OldValue2,$NewValue2);

Set-PnPFileCheckedOut -Url $PageRelativeURL

Remove-PnPWebPart -ServerRelativePageUrl $PageRelativeURL -Identity $WebPart.Id

Add-PnPWebPartToWebPartPage -ServerRelativePageUrl $PageRelativeURL -XML $WebpartXML -ZoneId $ZoneID -ZoneIndex $ZoneIndex

Set-PnPFileCheckedIn -Url $PageRelativeURL

Write-Host “Completed fixing broken links on the web part :” $WebPartTitle -ForegroundColor Green

Write-Host “=============================================================” -ForegroundColor Gray

}

}

#region [ Exporting the broken links fixed pages info to text file ]

if( $GetWebpartsCount -gt 0) {

‘Broken links web parts updated on the page : ‘ + $PageRelativeURL | Out-File $BroeknlinksReplacePageLogPath -Append

} else {

‘Broken links web parts not updated on the page : ‘ + $PageRelativeURL | Out-File $BroeknlinksReplacePageLogPath -Append
}

#endregion

}
}

Function ReplaceBrokenLinksonSubsite($SiteURL) {

Connect-PnPOnline -Url $SiteURL -Credentials $Creds

$AllSubwebs = Get-PnPSubWebs -Recurse

$SiteNumber=0

foreach( $SubSite in $AllSubwebs) {

$SiteNumber++

Write-Host “Processing Sub site no:” $SiteNumber ” — Out of total sites” $AllSubwebs.Count -ForegroundColor Yellow

$SubSiteURL = $SubSite.Url

ReplaceBrokenLinks $SubSiteURL

}

}
ReplaceBrokenLinks $SiteURL

ReplaceBrokenLinksonSubsite $SiteURL

Write-Host “——— Completed the broken links replacement process ———–” -ForegroundColor Green


Once the above script execution finished, run the below script again to confirm if still any old string value existed on the web part links.

#region [ Site Credentials ]
# ————————- #

$UserName = Read-Host -Prompt “Please enter user Email”
$PassWord = Read-Host -Prompt “Please enter user PassWord”

$Pwd = ConvertTo-SecureString $PassWord -AsPlainText -Force
$Creds = New-Object System.Management.Automation.PSCredential($UserName,$Pwd)

#————————— #

#endregion

#region [ Configuration Values ]

#————————— #

$SiteURL= Read-Host -Prompt “Please enter site ( newly created site collection ) URL:”

$BroeknlinksReplacePageLogPath = Read-Host -Prompt “Please enter broken links web part page to store logs EX: C:\log.txt”

$OldUrlValue =’Old string value’

$ConteneEditorType= ‘<TypeName>Microsoft.SharePoint.WebPartPages.ContentEditorWebPart</TypeName>’
$SummaryLinksType = ‘name=”Microsoft.SharePoint.Publishing.WebControls.SummaryLinkWebPart’
$ScriptEditorType='<type name=”Microsoft.SharePoint.WebPartPages.ScriptEditorWebPart’

#————————— #

#endregion

Write-Host “——— Started broken links replacement process ———- ” -ForegroundColor Green
Function ReplaceBrokenLinks($SubSiteURL) {

Connect-PnPOnline -Url $SubSiteURL -Credentials $Creds

Write-Host “Started replacing broken links on the site ” $SubSiteURL -ForegroundColor Magenta

$AllPages = Get-PnPListItem -List ‘Pages’ #Need to change the list name if we want get items from differen list

$TotalPages = 0

foreach ($Page in $AllPages) {

$TotalPages++

# if($Page[“FileLeafRef”] -eq ‘default.aspx’){

Write-Host “Processing page no:” $TotalPages ” — Out of total pages” $AllPages.Count ” — Page title:” $Page[“FileLeafRef”] -ForegroundColor Cyan

Write-Host “================================================================” -ForegroundColor Cyan

# Write-Host “Started replacing broken links on the Page :” $Page[“FileLeafRef”] -ForegroundColor Green

$PageRelativeURL = $Page[“FileRef”]

#region [ Check page checkout status ]

$ClientContext = Get-PnPContext
$CurrentPage = Get-PnPFile -Url $PageRelativeURL -AsListItem
$PageFile = $CurrentPage.File
$ClientContext.Load($PageFile)
$ClientContext.ExecuteQuery()

if($PageFile.CheckOutType -eq [Microsoft.SharePoint.Client.CheckOutType]::Online){

Write-Host “The current page ” $CurrentPage.File.Name “is in checkout mode, so the script is check in the page.” -ForegroundColor Green

Set-PnPFileCheckedIn -Url $PageRelativeURL
}

#endregion

$AllWebParts = Get-PnPWebPart -ServerRelativePageUrl $PageRelativeURL

foreach ( $WebPart in $AllWebParts) {

$GetWebpartsCount = 0

$WebPartTitle = $WebPart.WebPart.Properties.FieldValues.Title
[int]$ZoneIndex = $WebPart.WebPart.ZoneIndex
$ZoneID = $WebPart.ZoneId

$WebpartXML = Get-PnPWebPartXml -ServerRelativePageUrl $PageRelativeURL -Identity $WebPartTitle

if( ($WebpartXML.IndexOf($SummaryLinksType) -gt -1) -or ($WebpartXML.IndexOf($ConteneEditorType) -gt -1) -or ($WebpartXML.IndexOf($ScriptEditorType) -gt -1) ) {

if($WebpartXML.IndexOf($OldUrlValue) -gt -1) {

$GetWebpartsCount++

# Write-Host “Old URL value existed on the web part” $WebPartTitle -ForegroundColor Green

}
}

#region [ Exporting the broken links fixed pages info to text file ]

if( $GetWebpartsCount -gt 0) {

‘Old URL existed on the page : ‘ + $PageRelativeURL + ” on web part ” + $WebPartTitle | Out-File $BroeknlinksReplacePageLogPath -Append

} else {

# ‘Broken links web parts not updated on the page : ‘ + $PageRelativeURL | Out-File $BroeknlinksReplacePageLogPath -Append
}

#endregion

}

# }

}
}

Function ReplaceBrokenLinksonSubsite($SiteURL) {

Connect-PnPOnline -Url $SiteURL -Credentials $Creds

$AllSubwebs = Get-PnPSubWebs -Recurse

$SiteNumber=0

foreach( $SubSite in $AllSubwebs) {

$SiteNumber++

Write-Host “Processing Sub site no:” $SiteNumber ” — Out of total sites” $AllSubwebs.Count -ForegroundColor Yellow

$SubSiteURL = $SubSite.Url

ReplaceBrokenLinks $SubSiteURL

}

}
ReplaceBrokenLinks $SiteURL

ReplaceBrokenLinksonSubsite $SiteURL

Write-Host “——— Completed the broken links replacement process ———–” -ForegroundColor Green

I hope this script will reduce the manual effort to fix the broken links on SharePoint.

Posted in Uncategorized | Leave a comment